><}}}'> <'{{{>< Last Update to This Page: 12:16pm November 14th, 2023 ><}}}'> <'{{{><
** Disclaimer : All information I have provided, while accurately lived out by myself is shared completely **
** as is with absolutely no warranty of any kind. I take no responsibility for anything you do or use it for. **
PLEASE REFRESH THIS PAGE OFTEN AS I WILL BE UPDATING IT MULTIPLE TIMES A DAY!
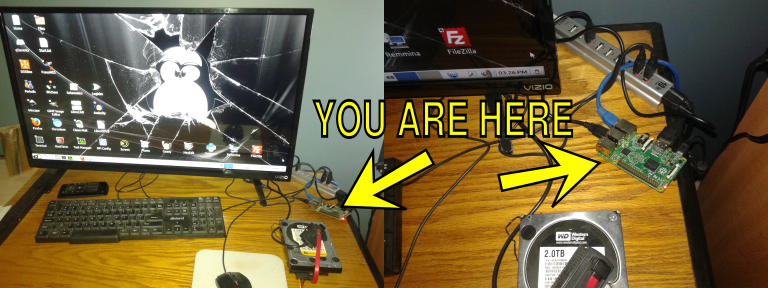
The "You Are Here" is literal. The photos are of a RPi2 running my WWW Stack sitting on my desk using
the exact build image that is contained on this page; which is what you are accessing right now. :)
OSMC / KODI Image is NOW Here!
Nothing to do other than Download, Unpack, ShaSum and write the image to a card of 4GB or more.
The partition is only 2.5GB and can be expanded to fit your whole SD Card following the same steps
outlined in Step 3 for resizing the partition. I will post some instructions for doing some
routine stuff in OMSC after working today. :)
Default Username/Password is osmc alug
SHASUM : eda4892a0041a0eda515b01636a34f3b6d97b48d OSMC-Kodi_04062017.img.zip
http://pi.wecraftalot.com/OSMC-Kodi_04062017.img.zip#*#*#*#*#*#*#*#*#*#*#*#*#*#*#*#*#*#*#*#*#*#*#*#*#*#*#*#*#*#*#*#*#*#*#*#*#*#*#*#*#*#*#*#*#*#*#*#*#*#*#*#*#* This image has been tested and confirmed to work on the: RPi 2 B V1.1 [BCM2836] & 3 B V1.2 [BCM2837] Ricks Raspberry Pi that wouldn't boot is a "Raspberry Pi Model B+ V1.2", it's not a 2 OR a 3 but a 1. Latest: I will be posting the Media Center Image up here start of the week. I have a few friends that set them up over the weekend and got rave response from it. I'm just about done with adding the WIRELESS ROUTER feature. Ran into some hickups with it dropping the network that I think I have sorted out. Finally some Cluster Documentation will be coming. Just started writing it out and I will more than likely be posting multiple images that are already setup to cluster and scale to any number of Pi's. IF the stuff I ordered get here before our next meeting I will try to have a x4 Cluster setup, worst case a x2 for sure. Some tune ups to the current image coming. I'm pretty sure I will be adjusting the WWW build by removing Apache and MySQL and replacing with Cherokee and MariaDB. Both 100% Open Source, can be compiled using nothing more than standard C libs and with Cherokee Many benefits of apache while lighter weight and faster! #*#*#*#*#*#*#*#*#*#*#*#*#*#*#*#*#*#*#*#*#*#*#*#*#*#*#*#*#*#*#*#*#*#*#*#*#*#*#*#*#*#*#*#*#*#*#*#*#*#*#*#*#* Page Navigation:Welcome!
1: Download The Image, SHASUM it and Unpack it
2: Write the Image to an SD Card of 8GB or more
3: First Boot, Password and Filesystem Resize (easy stuff)
4: Setting Your Perfect Video/Screen Resolution
5: Diving into your Raspberry Pi ALT-PC!
6: Using the Web Server Stack (Apache / PHP / MySQL / vsFTPd)
7: The GPIO and all its Glory!
8: RPi3 Wireless Router!!! *Conspiracy Free Edition
If anyone needs anything, send me an email to: xwarmachx@yahoo.comWelcome!
######################################################################################################## Hello ALUG and Other Visitors! This will be my Raspberry Pi Trek Log to go with the Build I have Created. It has been my PRIMARY GOAL to create a complete ALTERNATE PC using the Linux System and the Raspberry Pi Hardware. As the owner of a software company, I have painfully and successfully cut 100% of my ties with all microsoft products for the passed 2 years and now use heavily modified linux systems to run my entire company, servers and everyday PC's. It's been a long yet humbling road far from ending. I will try to be as detailed as possible so everyone can learn as we go. I created this build on a FULL Ubuntu system, not like the debian/raspbian system is. A quick note, I was originally using a MATE build, however I ran into several problems with the Kernel drivers that were causing sound problems that led to processor stalling. After a lot of research into it, it's related to commands in the audio system that are "blocking" and in turn would cause commands to the processor cores to stop completely until the blocking was cleared. In many cases, it wouldn't clear at all and programs using the audio system would sit suspended. I confirmed this issue existed in all the mainstream distros that exist for the Pi2 & 3. So I took everything I had done to my original MATE system, and started from a fresh 16.04 LTS Xenial Ubuntu build solving the Kernel issues from the start. The new build utilizes the XFCE Desktop which I try to make as close to the windows XP system as I can get it. I have always been a fan of the simplicity of the menus and how everything works with light overhead. This build has succeeded in that. A quick note about troubleshooting the image writing process. The image was built on the very OS Image that is running it using the dd command. So for some quick version specs... Linux Kernel - Version 4.4.43-v7+ dd - Version 8.25 tar - Version 1.28 shasum - Version 5.95 ########################################################################################################Back to the Top
1: Download The Image, SHASUM it and Unpack it
http://pi.wecraftalot.com/RPi-ALUG_01282017.img.tar.gz
shasum : 3897eec11650dc3ebed51680f3395757c8876009 RPi-ALUG_01282017.img.tar.gz The files are hosted on the Pi which I have setup to allow 4 downloads at 256KB each. It will take 57 Minutes to Download the complete image. I have a 1MB Upload but my RPi also hosts 16 TerraBytes of Data, so please be patient for your download as you will get it. I tried setting up a private torrent however, the trackers don't work running with all the other serving I have going on. HTTP Download for now. The image is completely pre-installed. There is NOTHING to do but write it to an SD Card of 8GB or more and enjoy! I'm a very heavy computer user so I have added everything I could think to get in here that people will enjoy using. After downloading the image, you will want to SHASUM it and make sure it downloaded without errors. Open a Terminal then Change to the directory where you saved the image and type: shasum RPi-ALUG_01282017.img.tar.gz You should get the following response: 3897eec11650dc3ebed51680f3395757c8876009 RPi-ALUG_01282017.img.tar.gz Next you will need to unpack it, in the terminal and same folder type: tar -xvzf RPi-ALUG_01282017.img.tar.gz Just to be sure your extraction method did not alter the file in any way shasum the unpacked image. shasum RPi-ALUG_01282017.img 49214e8f55f4d44db6532a6c949b0341545d493b RPi-ALUG_01282017.img Now that you have the original image!Back to the Top
2: Write the Image to an SD Card of 8GB or more
Next let's write it to the SD Card. At this point I no longer use windows for anything, so everything I document will be from Linux. In Terminal Type the Command: sudo fdisk -l You will need to find where the SD Card has been mounted to your filesystem. In my case, it looks like: Disk /dev/sdb: 7.5 GiB, 7990149120 bytes, 15605760 sectors Units: sectors of 1 * 512 = 512 bytes Sector size (logical/physical): 512 bytes / 512 bytes I/O size (minimum/optimal): 512 bytes / 512 bytes Disklabel type: dos Disk identifier: 0xXXXXXXXXXX Next make sure your terminal is in the directory that contains the image and write it using: sudo dd if=RPi-ALUG_01282017.img of=/dev/XXX bs=1MB This command will write the image to your SD Card, SO PLEASE MAKE SURE you have the right DEVICE. Getting this wrong will destroy the data on the target, even if you accidentally put your main drive. Change the /dev/XXX to what your fdisk list says your SD Card is at, in my case /dev/sdb After the image has completed writing, which will take between 10 - 20 minutes. You can safely eject the SD card and put in your raspberry pi. Start it up and let the fun begin! EVERYTHING below here is done ON THE PI Using the my image. :)Back to the Top
3: First Boot, Password and Filesystem Resize (easy stuff)
########################################################################################################
The first thing to know is your credentials.
Username: pi
Password: raspberry
ROOTpwd : raspberry
and that you should change them for pi AND root... Open a Terminal window and do a
sudo passwd pi
using passwd will make you adhere to the stricter password standards, sudo will allow
it to be set to anything you want regardless of how weak it may be... this changes username pi.
sudo passwd root
Change the root accounts password for security just in case it's ever an issue.
To get started we will need to resize the file system use the full size of the sdcard you have
written this image too. It's easy, so don't be afraid to mess things up, you can always re-write
this image.
1: Open a terminal
2: Type
sudo fdisk /dev/mmcblk0
3: Follow this sequence of keys to delete and create the new partition using all available space.
d (press enter) //Here you are telling fdisk to delete a partion.
2 (press enter) //You have told fdisk to delete partition 2 (Partition 1 contains the boot)
n (press enter) //Create a new partition
p (press enter) //Partition Type being Primary
2 (press enter) //2 again being the second partition
(Press Enter) //Will set the available start to the default end of the first partition
(Press Enter) //Will set the available end to the default maximum which is last sector on the disk
w (press enter) //Write the config and exit fdisk
4: Now you need to reboot. Type
sudo reboot
5: Now the you have rebooted, open a terminal again and type the following
sudo resize2fs /dev/mmcblk0p2
6: Congratulate yourself, that's the hardest thing you will have needed to do, now just use
and enjoy the system! Everything else in hear I have written just for reference and knowledge.
/dev/sdb1 2048 499711 497664 243M c W95 FAT32 (LBA)
/dev/sdb2 501760 4696063 4194304 2G 83 Linux
########################################################################################################
Back to the Top4: Setting Your Perfect Video/Screen Resolution
Let's make sure your display resolution is perfect for your screen. Start by opening your home folder, go under pictures and double click the "resolutiontest.png". The entire image is PERECT pattern of black and white pixels. IF there is ANY distortion what so ever anywhere in this image then your screens resolution is not set properly. Distortion meaning you can't see the exact pattern which is B B B B B B B B B B B B B B B B B B B B B B W B W B W B W B W B W B W B W B W B W B B B B B B B B B B B B B B B B B B B B B B B W B W B W B W B W B W B W B W B W B W B B B B B B B B B B B B B B B B B B B B B B B W B W B W B W B W B W B W B W B W B W B Incorrect resolutions will make areas of the pattern look slightly bunched together and other areas fine. It's also easy to notice fonts don't appear to be perfectly sharp on your screen or only parts are. Find the native resolution of your screen and set it in the raspberry pi config file by launching the link on the desktop that says "RPi Config". Between 3 and 4 pages down you will come into the HDMI_MODE Section. At the bottom of the modes list you will see the config option "#hdmi_mode=##" Uncomment that line by removing the # sign and then select the most number from the list that fits your screen. Mine is set to hdmi_mode=82 #That's the 1920x1080p resolution or "1080p" Other common TV's use the hdmi_mode=81 #1366x768 hdmi_mode=85 #720p If your resolution test looks good without setting this, it means your screen sends out the proper signal to tell the display driver what resolutions it supports. Mine didn't and I had to set it. ########################################################################################################Back to the Top
5: Diving into your Raspberry Pi ALT-PC!
***
*** A SUPER IMPORTANT NOTE! The OMX Player is the video player that let's the Pi run full 1080p
*** videos like you would expect to watch them. However, the player is a little,,,different. To
*** make it work I created some scripts that let you double click a media file like you would be used
*** to and play it. However, the OMX Player does not have on screen controls but runs in a terminal
*** windows in the background. You can press Escape to EXIT, space to PAUSE/PLAY, arrow keys to jump
*** time, and much more which all works GREAT providing the terminal window stays in focus in the
*** background. So what I want you to do is remember this... If the terminal in the background loses
*** focus you will have no way to control anything until the video has stopped playing. Imagine
*** you play a 2 hour movie and can't stop it... pulling the plug sucks because you can damage the
*** file system. SO, Understand and remember this! Pressing ALT+TAB (like in windows) will change
*** focus of open windows. I typically only watch big movies with everything else closed but more times
*** than I can count the updater windows popped up and I lost my controls. It's just as easy to hit
*** ALT-TAB and press space and if your video pauses, your back in focus. If it doesn't repeat until
*** you get the OMX Player in the terminal back in focus. You will, have faith because you won't be
*** able to see it. So again, SUPER IMPORTANT and REMEMBER THIS SECTION *** Section.
*** There's a video in the home/movies folder you will enjoy and most likely find this out from.
***
Getting around the desktop. I've added some of my own Linux Enthusiast flavors, feel free to change
them if you'd like. I love the background signifying TUX breaking a window... And I've created the
MENU using a pretty little sleeping tux icon, for fun. :)
I have set the desktop up to resemble a clean windows XP style of machine.
The bottom "start" bar is highly configurable and can be changed easily edited by right clicking
in the empty space of the bar and clicking "properties" OR "add to panel".
Each item has its own options as well as can be "moved" from the right click menu.
Unlike windows XP, when open windows create buttons on the bottom bar, they can be moved around
by dragging and dropping them to change the order.
The main menu when clicking the "sleeping tux" button in the bottom left can be edited and by right
clicking on any of the programs on the menu they can be added to your quick launch on the
bottom bar OR placed on your desktop.
I have put many things on the desktop just so you see them all as we run through them.
Start.txt is the original version of what's here on this site. Something to get you started.
Home with the Filing Cabinet Icon is the PacmanFM File Manager. It's super light weight, very fast
and will do almost everything you will need from a file manager. I say almost and which is why...
File with the Folder Icon, is also installed. This is Nemo, a much more featured file manager that
gives you access to the right click - open as root. Which is important for making changes outside
of the files within your userspace. Most of the time you won't need this feature but you may find
you like this file manager better. (I do) But I'm not opposed to using the lighter weight one 9/10 times.
DOSBox is exactly that, a linux based DOS Emulator! One that's been pretty well ported to the ARM code
base! So, let's try a few things with dosbox. Open it up. Normally, you would need to have DOS stuff
to run and have to mount the dos drive. I've taken care of this for you and automated the process.
You will notice in your home folder, there's a DOS folder. Everything in this folder will be made
available to the DOSBox! Since you're looking at your C: prompt, type dir. I threw in some games to
play. Type: cd epicpin and then pinball to start the game. It runs great, sounds great and epic pinball
is just that, epic! The two shift keys are your paddles, space bar starts the ball moving.
There's several different boards to play.
When you're done with that, try going into each of the other game directories and launching the main
game exe files to play them. Hopefully we all remember how to use DOS. :)
FceuxNES is a nintendo rom emulator! I took the liberty of tossing in a few roms that anyone that has
nintendo should have. If you don't have them, (you're suppose to delete them). Start by opening the
emulator, and hitting File, Open Rom. Open your NES folder which is where the NES stuff resides. Try
out the Galaga, or the Mario Bros. The original Zelda is of course a major classic. The controls
for the NES Emulator are f,d,space,enter and the arrow keys. I may be wrong and you can check the
key bindings in the menu to confirm or change. The tweaked all the settings I could to get a good
game scale and great speed out of the pi. I didn't write this emulator so what it is, is what is it.
Periodic needs no explantion, it's a wonderful resource of information on all the elements.
BKChem is a molecular model builder! I haven't messed with this too much yet but I certainly encourage
anyone interested to tinker with it.
Schematics is a Electronics Program that lets you digitally assemble circuit boards and test them in
a digital space. Amazing program for playing with ideas and learning electronics.
Logisim is another Electronics Program that lets you assemble and test circuits. I believe this one is
a little more detailed than the other one. (or maybe it's the other one) I've used them both, and I
would say you should too!
Inkscape is AMAZING!!! If you are familiar with tools like Adobe Illustator and CorelDraw this is the
open source free version of commercial vector graphics packages smashed into one. I have personally
used it to run banner printer/plotter cutters to make 3 foot wide full color signs, vinyl graphics
for car wraps and print blue prints using the vector functions to HPGL and Go Code equipment. This
is one of the most powerful application in the linux suite in my personal opinion as I use it on a
daily basis. Of course, straight from the pi to my plotter equipment! I will admit though, that the
commercial products were a bit easier to use however, Inkscape has a touch of a learning curve but I
found it's capable of doing more, just not quite as well organized. However, always updating!
GIMP Image Editor
If you read the description on Inkscape, I would say this is an equivilent to the more main stream
photoshop packages. However, I will also say the same thing, it's not as easy to use as they are and
requires a bit of a learning curve as well. However, again, you can do a LOT of things with this editor.
LibreCad is a 2D Cad program! It's light weight, has much of the features you would expect your older
autocad system. I haven't gotten to tinker with this program too much so feel free to provide some
feeback after you use it yourself.
Audacity; If you've ever used an advanced wave editor to rip streams, record high quality audio, merge
multiple instrument tracks together and much more, you would use this program. I use it all the time
for cleaning up audio streams, cutting wavs up, using the effects and saving things to mp3. This is
a must have program for doing anything outside of simple and it works great! One thing to note is that
the RPI hardware does not feature a microphone, so you will need to add a USB mic to make recordings.
Firefox needs no explanation.
Chromium also needs no more explanation than it's google chrome compiled for the ARM.
Claws Mail is an awesome E-Mail client! It closely resembled the older outlook express. You can setup
multiple mail accounts and one thing that's very neat about this program is ALL of your emails are
saved individually in a folder you can access from the file manager. This prevents the old microsoft
inbox/database files from being corrupted and you losing all your emails. Plus it makes it super easy
to back up your email, copy certain ones, and import them into any other programs. Very light weight,
very stable. My inbox right now on my Raspberry Pi has 18744 emails taking up 650MB of space...
LibreOffice is a very full featured office suite right of microsoft offices alley! I use these programs
pretty often and can tell you that they open all the main stream commerical formats and I haven't
found anything in any other package I couldn't get done in Libres, and it's always updating, and free.
Terminal is your standard everyday terminal.
RootTerm is your terminal running in ROOT Mode so be careful using this. I have found many reasons to have
this available and as a coder / developer / engineer I use it a lot.
Task Manager is easy enough to see what's going on.
RPIConfig is my shortcut to sudo'ing your /boot/config.txt file that controls all the firmware options
that run your raspberry pi. The config file included is the extremly detailed version that has about
every option and description of everything you would probably ever not need to know, just so you know.
Screen - You can remove this. I used to use it to fix the screen resolution when an application crashed and
left the resolution in something outside of the desktop, but on the RPi I don't believe that the
xrandr works with it's firmware. Feel free to delete it.
Pluma - My all time most favorite text editor! It recognizes all your color syntaxing for all your file
types, it's light weight, has lots of features and very little over head. I use it everyday, nearly
all day. If my computers are running, it's most likely editing a whole bunch of code!
Geany - is an enchanced code editor. I used to use it before I met pluma. Now that I have I almost never
use it. However, Geany is a complete IDE and let's you integrate running code in a managed terminal
installing tons of plugins and has a huge developer support base. I do use it every once in a while
when I find characters in files that I can't see in pluma because Geany will let you view EVERY symbol
in a file even if it's not supported by your character set. It's my number 2, just like Jean-Luc Picard
had his number 1... and look how well that worked out. :)
HexEdit is exactly what it says. This program will let you look at anything in bit by bit to binary.
Python3 is the IDE for Python and Important to note the program you will use to access the GPIO or
General Purpose Input Output System that is all the pins hanging off the edge of your raspberry pi.
We will get more into this later but also know that it's the main editor for creating and running
python code.
Remmina is another go to program that will let you REMOTE Desktop into windows work stations or SSH into
linux systems or VNC into a system. It's a well built program that supports full screen, light over
head and is contantly being updated. If you need to do remoting, this is your program.
FileZilla - A very good, light weight, open source FTP File Transfer Program. I use this almost as much
as I use Pluma to edit code. (Mainly because I push the code out to other computers) FTP is your
friend and FileZilla is stable, fast and still being developed. It's replaced just about any other
commercial File Transfering programs I've ever had to use except it lacks some upper high end security
protocols that some really large companies tend to force you to use. But for now, connect to your pi
after enabling the WWW stack later down this page.
Now that we are off the desktop... Let's get into the menu.
Sleeping Tux holds all. and since most of them are on the desktop you will want to focus on the
Preferences and System Tools first. Everything under here is pretty self explanitory. The system
honestly is so well setup now I'm not even sure when the last time I got into these menus was.
So for now, I'll come back to this later...
The "Panel" as it's called is the system running to make up your "start bar". You can right click almost
anywhere on the bar and edit the object under your mouse, OR the panel itself. Editing the panel
will let you add new features to the bar, add more bars and place them on other areas of the screen,
and change or edit any of the properties of the items that currently make up the bar itself.
From left to right you will see it's made up of
Menu, Show Desktop, Launchers, Window Switcher, Temp Monitor, Desktops, Notifiers, Time and Shutdown.
I set the panel up this way because it most closely resembles the easy and usability of the original
windows XP system. Feel free to make this your own but as a very heavy user, this is the winning
setup that I use.
The DESKTOP Switcher can be activated by hitting CONTROL ALT LEFT or RIGHT and if you add more
desktops you can use UP and DOWN as well. The Raspberry Pi is limited in hardware so rather than
stressing it I keep my desktops down to 2 and usually run a remote computer on one and switch back
and forth between it on Desktop 2 and my Pi on Desktop 1. Works Awesome and is by far one of the most
productive features I got used to using in linux from the begining.
Back to the Top6: Using the Web Server Stack (Apache / PHP / MySQL / vsFTPd)
########################################################################################## ########################################################################################## Apache2, PHP7, MySQL and VsFTPd are also installed and pre-configured. Your MySQL Root password is of course: raspberry The WWW Server services however are disabled unless you want to use them. TO start and stop the ENTIRE WWW Stack, open HOME and then Scripts and double click on Enable_WWW.sh, Click Execute in a Terminal, and enter your password. Disable_WWW.sh, Click Execute in a Terminal, and enter your password. Enable will activate all the services Immediately, making the web server available AND it will put the services back into the system startup so they stay running. To test it out after enabling, open firefox and type http://localhost in the address bar. The Directory where the websites are located is: var/www This location is the "DocumentRoot" set in the /etc/apache2/sites-availabe/000-default.conf The FTP Service is installed and configured to allow any user on the pi to log in via FTP and upload/download files. Try it! Start up File-Zilla and use the localhost connection I created using the pi username/password. If you don't need or won't be using the WWW Server, just Disable_www.sh it and it will stop all services AND remove them from starting up again on reboots. ########################################################################################## ##########################################################################################Back to the Top
7: The GPIO and all its Glory!
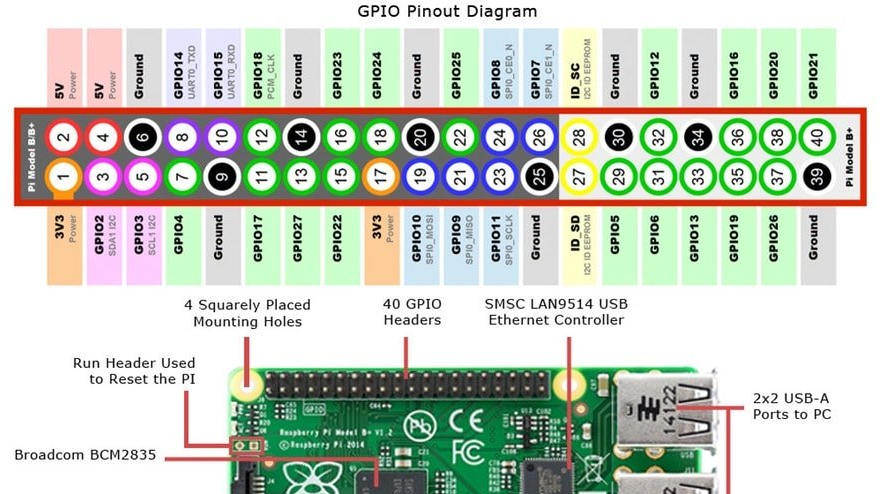
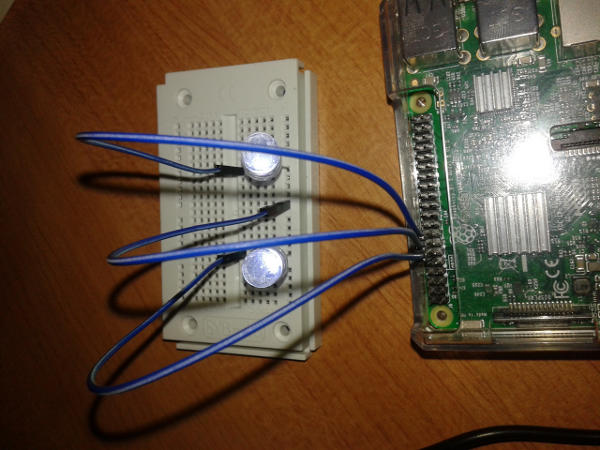
Using the GPIO requires python to run in sudo mode. I set it up so it will ask for your password when you start it so we have access to the hardware. From a security point of view the /sys/mem is the part of the OS that must be accessed to get the information into the hardware for the pi to process the requests for the GPIO itself. A lot of damage can be done sudo'ing something that has this level of access so make sure you are only running python this way when you want to play with the GPIO system. G.P.I.O. What's it all mean? General Purpose Input Output Like many maNY MANY other pieces of hardware that exist, the GPIO is nothing new, but it is awesome. The RPi 2&3 come equiped with a lot of pins to work with. Refer to the above image provided so you can see just what each one does. Let's get started by opening Python3 from the Desktop (As that is the link I modded to SUDO) After the Python3 IDE has opened up, hit File, Open and browse your GPIO folder. I have placed our first example to play with in here called LEDhz.py In this program I have written it is designed to pulse 2 LEDs at the exact hertz set by the function I created. Let's run through this program and note what it is doing. The hardware that this script runs is very simple. A Wire running from GPIO 23 carry's power to the positive leg of an LED, the negative leg of the LED is simply connected to any GPIO GROUND. Then again a wire connecting GPIO 18 is connected to the second LED and again, negative to GPIO GROUND. That's not the most simple circuit (we could have used one) so you're already up double hard! Here's a photo, as you can see, I chose 18,Ground,23 pins because they are all directly next to each other. It made it very easy to setup. I also recommend purchasing MALE to FEMALE Jumper Wires as one side will go over the Pin on the Pi and the other will plug into any solderless bread board. Very basic electronics at work here as you can see.
Now I think it is worth mentioning something here... You can buy a headers cables for the Pi which will
be a 40 pin IDE cable that pre-plugs into a bread board. I have a few of them but rarely find them when
I'm tinkering, SO I use my single jumper leads. However, the Warning coming. I have accidentally dropped
a hot lead on my GPIO and nuked my Pi before. Luckily it's only a $35 lesson so I urge you to be careful
and will say it's worth having the Raspberry Pi developement bread board because you can certainly
reduce your chances of this. Also, I had a car battery running 12 Volt motors and the Pi's can't handle
anything over 6 volt touching them anywhere. Now onto the PROGRAMMING Part of the GPIO!
My included Python script broken down for you.
###############################################################
import RPi.GPIO as GPIO
import time
#These two lines ask Python to include the libraries with the functions we are going to use.
left = 23 #Sets Output PIN Number for LEFT LED
right = 18 #Sets Output PIN Number for RIGHT LED
dur = 10 #Duration in seconds between switching hertz.
#This function does the math so that in 1 second it knowns exactly how long to leave power
#to the pin switched on, and again off. Looks easy enough but I created this after a lot of
#work and it's now only simple because, I finally made it that way. So you're welcome.
def pulse(hz,dur,left,right):
sl = (1/hz)/2
rps = 0
print("Light On Pulse; Hertz:",hz)
while (rps < dur):
GPIO.output(left, 1) #The GPIO.output function will tell (pinnumber, state ON/OFF)
GPIO.output(right, 0) Tells right (pin 18) to turn OFF or 0
time.sleep(sl)
rps = rps + sl
GPIO.output(left, 0)
GPIO.output(right, 1)
time.sleep(sl)
rps = rps + sl
#Believe it or not, it's really that simple. Information in the digital world is nothing more than
#something being turned on, or off (0 or 1) in a specific amount of time to create information.
#We are doing nothing different here which is why this little function is so cool. The two LED's
#will flash at the desired frequency (hertz) given below.
GPIO.setmode(GPIO.BCM) #This function sets up the use of the GPIO system from the library we included.
GPIO.setwarnings(False) #Turn this on to see warnings reported by the Pi, easy use we have here.
GPIO.setup(left, GPIO.OUT) #Sets up the PIN Number we defined up top
GPIO.setup(right, GPIO.OUT) #Sets up the PIN Number we defined up top
# We set the pins up so we can clear their location in memory and get ready to use them. These GPIO ##'s
# will exactly match the image posted above in the GPIO Pinout header. This way you know where to plug
# stuff in OR change the code to reflect where you have things plugged in. Everything on the header
# labeled as a GPIO ## is a Numbered Pin that WE can control using the code written right here. Ultimately
# we can set the state of the pin and check the state of the pin. Easy as that. :)
GPIO.output(left, 1) #Turn ON, if plugged in properly your LED should light up now
GPIO.output(right, 1) #Turn ON, this is just a little warmup before our function kicks in.
time.sleep(5) #sleeping for 5 seconds will leave the lights powered on for 5 seconds.
pulse(5,dur,left,right) #And start the function. turn the two lights on at the same time in the
pulser(5,dur,left,right) #set frequency of 5 hertz for a duration (we set above) as 10 seconds)
pulse(10,dur,left,right) #in your code, there's another function "pulser" which reverses the pulse
pulser(10,dur,left,right) #to be turned OFF for the 5 hertz (times in one second)
print("End")
#Clears the PINs and cleans up GPIO, this area is good practice to get into. It will set the pins to
#an OFF state and clear the memory being used for the GPIO System. Pretty simple.
GPIO.output(left, 0)
GPIO.output(right, 0)
GPIO.cleanup()
########### End Python Script
#And that's the end of the script. Now, if you have your hardware setup, go up to the menu and hit RUN,
Then RUN MODULE. You should see the obvious which is the LEDs come on for 5 secs, then begin flashing
at the rates your program is setup for. Once done running it will shut down and you're all done. If
you have to STOP it early you can EXIT the Python shell and it will close everything for you.
And that's that! You have just successfully controlled with great accuracy the flashing frequency
of a light. I seen circuits from 30 years ago that costs $4,500 USD that did this very same thing for
the Government. Of course, in this case we have an entire computer doing it for under $50 USD. Amazing
how times have changed! Embrace it and enjoy it and keep learning it so we can keep evolving technology!
!!!!! Now a small warning. We are driving these LED's directly off the power of the GPIO from the Pi.
As I have seen countless warnings for we are not really suppose to do that. It's a good habbit to
Isolate your controlling hardware from your power sources so you can output a lot more power and also
never have to worry about it burning up your micro-controller / entire computer. :)
Now, to note, the 2 LEDs, I've ran powered by the pi for literally the last 2 years and I have yet to
have it burn up my Pi's. So just a forewarning and piece of good info to use. Trying to run motors,
will more than likely smoke our Pis, so this is of the few things we can do worry free.
Back to the TopRPi3 - WiFiPi Router!
Step 0: Fix the UDev Device name issue in recent linux versions.
sudo pluma /boot/cmdline.txt
//Append the following to the end of the configuration line making sure it all stays on 1 line.
<###############
net.ifnames=0
###############>
Step 1: Install the hostapd and isc-dhcp-server packages
sudo apt-get install hostapd isc-dhcp-server
Step 2: Backup and Update the DHCP Daemon Config file.
sudo cp /etc/dhcp/dhcpd.conf /etc/dhcp/dhcpd.bak
Uncomment the line that says "#authoritative;"
<###############
authoritative;
###############>
Add the folowing to the very end of the file:
<###############
subnet 192.168.2.0 netmask 255.255.255.0 {
range 192.168.2.100 192.168.2.150;
option broadcast-address 192.168.2.255;
option routers 192.168.2.1;
option domain-name "local";
option domain-name-servers 156.154.70.1, 156.154.71.1;
}
##############>
//Add the wlan0 device to the dhcp interfaces list.
sudo pluma /etc/default/isc-dhcp-server
<###############
INTERFACES="wlan0"
###############>
Step 3: Backup and Update the network interfaces file
sudo cp /etc/network/interfaces /etc/network/interfaces.bak
Append the following to the end of the file:
<###############
allow-hotplug wlan0
iface wlan0 inet static
address 192.168.2.1
netmask 255.255.255.0
up iptables-restore < /etc/iptables.ipv4.nat
###############>
Step 4: Create a new hostapd configuration file and set the service to use it.
sudo pluma /etc/hostapd/hostapd.conf
<###############
#driver=nl80211
interface=wlan0
ssid=WiFiPi
hw_mode=g
channel=6
macaddr_acl=0
auth_algs=1
ignore_broadcast_ssid=0
wpa=2
wpa_passphrase=raspberry
wpa_key_mgmt=WPA-PSK
wpa_pairwise=TKIP
rsn_pairwise=CCMP
###############>
sudo pluma /etc/default/hostapd
<###############
DAEMON_CONF="/etc/hostapd/hostapd.conf"
###############>
Step 5: Backup and Modify the /etc/syscntl.conf file
sudo cp /etc/syscntl.conf /etc/syscntl.bak
//Uncomment the following line:
<###############
net.ipv4.ip_forward=1
###############>
Step 6: Modify the IPTables Firewall forward between wireless and hardline
Note: Each one of these are full commands and you need to press enter at the end of them.
sudo iptables -t nat -A POSTROUTING -o eth0 -j MASQUERADE
sudo iptables -A FORWARD -i eth0 -o wlan0 -m state --state RELATED,ESTABLISHED -j ACCEPT
sudo iptables -A FORWARD -i wlan0 -o eth0 -j ACCEPT
sudo sh -c "iptables-save > /etc/iptables.ipv4.nat"
sudo reboot
TEST THE SETUP!
sudo service isc-dhcp-server start
sudo /usr/sbin/hostapd /etc/hostapd/hostapd.conf
//This will START the Access Point, try connecting to it with another device and you will see
//the connection being made in the terminal. Try the internet and if all works, you're good!
//Press Control C and then solidify your router setup.
Final Step: Set Services to Run during Boot.
sudo update-rc.d hostapd enable
sudo update-rc.d isc-dhcp-server enable
!!!NOW FOR THE REAL FUN!!!
sudo apt-get install wireshark
Answer NO to the installer question.
Once done, start wireshark are a super user from the terminal.
sudo wireshark
You will get a few warnings / errors, ignore/ok them. Once up, select the "ANY" Device from the
list and enjoy watching CONSPIRACY FREE, UN-FILTERED TRAFFIC from Anything Communicating through it!
Back to the Top//Change the two entries in this file from 1's to 0's... etc/apt/apt.conf.d/20auto-upgrades //Some Useful Linux Commands all related to System Services systemd-analyze systemd-analyze blame systemctl list-unit-files systemctl list-units systemctl –failed systemctl list-unit-files –type=service systemctl start name.service systemctl stop name.service systemctl restart name.service systemctl reload name.service systemctl status name.service systemctl enable name.service systemctl disable name.service ########################################################################################## ########################################################################################## These are all System Variables that will give you information about the PI Hardware cat cpu0/cpufreq/scaling_available_governors cat cpu0/cpufreq/scaling_governor sudo echo performance > cpu0/cpufreq/scaling_governor echo 5 > /sys/devices/system/cpu/cpufreq/ondemand/up_threshold echo performance > cpu0/cpufreq/scaling_governor echo performance > cpu1/cpufreq/scaling_governor echo performance > cpu2/cpufreq/scaling_governor echo performance > cpu3/cpufreq/scaling_governor cat /sys/devices/system/cpu/cpu0/cpufreq/cpuinfo_cur_freq cat /sys/devices/system/cpu/cpu0/cpufreq/cpuinfo_max_freq cat /sys/devices/system/cpu/cpu0/cpufreq/cpuinfo_min_freq //Display the GPU Temperature vcgencmd measure_temp //ARM CPU Temp / 1000 for C cat /sys/class/thermal/thermal_zone0/temp ############################################################ //Some other useful linux command stuff. espeak -s 125 -f PiTalk.txt espeak -p 40 -a 200 -s 125 -f PiTalk.txt //this command will use SSH to push a file from your current linux system to the raspberry pi //NOTE you will need the exact ip address of the pi itself. scp "localpath/localfile" pi@192.168.1.100:/home/pi/Desktop/ //Disables the HDMI port saving about 30ma When not needing to be used. /usr/bin/tvservice -o //This command will add your pi user account to another group, I had to do this to give pi //access to the website available on the http://localhost which points too /var/www sudo usermod -a -G www-data pi